Saturday, August 25, 2018

Come Stamp With Me - Animal Outing Puzzle Piece Card

Sorry, I missed my Thursday post.  This was due to a power outage right in the middle of creating my post.  Then, life was already scheduled and I didn't have time to come back to finish the post until today.  I hope you see this post and enjoy.

This is the first post for the August Come Stamp With Me Fun Techniques Class.  When I first saw the Animal Outing Stamp Set in April at the SU Regionals in Las Vegas, I fell in love with this stamp set.  This is the second card I have made using this stamp set for the Come Stamp With Me Classes.  I will post a photo below of the first Animal Outing card I made.  The first card "Wild About You" focused on the SU Animal Outing Stamp Set and the Animal Friends Thinlit Dies.  The Puzzle Piece  card took a different approach and focused on the Animal Expedition DSP.  There are so many different ways to use all the Animal Outing products.  They can be used for: birthdays, welcoming new baby's, friendship, congratulations, thank you, friendship, etc.  The ideas and possibilities are endless.

This is the card I designed for the June 2018 Come Stamp With Me class.  
Everyone fell in love with the stamp set.  There was a great
debate about which animal was the favorite.  Quite
frankly, I love them all.


 The sky was lightly colored in using a sponge dauber and 
SU Balmy Blue ink.  

The grass was a separate piece
randomly cut out and using a sponge dauber with
SU So Saffron, Lemon Lime Twist, and Old Olive inks
to create the grassy knoll.

The ground was a separate piece using
the SU Swirly Scribbles dies to cut the slope.
It was colored in using SU Crumb Cake and Soft Suede Inks
with a sponge dauber.

All the animals were stamped on Whisper White and 
then die cut, including the frog on the branch.
The Rhino was stamped in SU Basic Gray and colored
in using the SU Smoky Slate Stampin' Blends and 
Bermuda Bay and Daffodil Delight Blends for the bird.

The Giraffe was stamped in SU Crumb Cake ink
and colored in using the Stampin' Blends of Daffodil 
Delight, Pineapple Punch, and Soft Suede.

The Kangaroo and Koala were stamped in SU
Soft Suede and colored in using Crumb Cake 
for the Kangaroo and Smoky Slate for the Koala.


This is the inside of the card made in June.  I 
love this frog on the branch.  This was stamped
in Memento Black and die cut. The frog and leaves 
were colored in using SU Old Olive Stampin' Blends and 
the branch with Crumb Cake Stampin' Blends.  This 
is a fun card to make.  

And now, the card we made
in August.


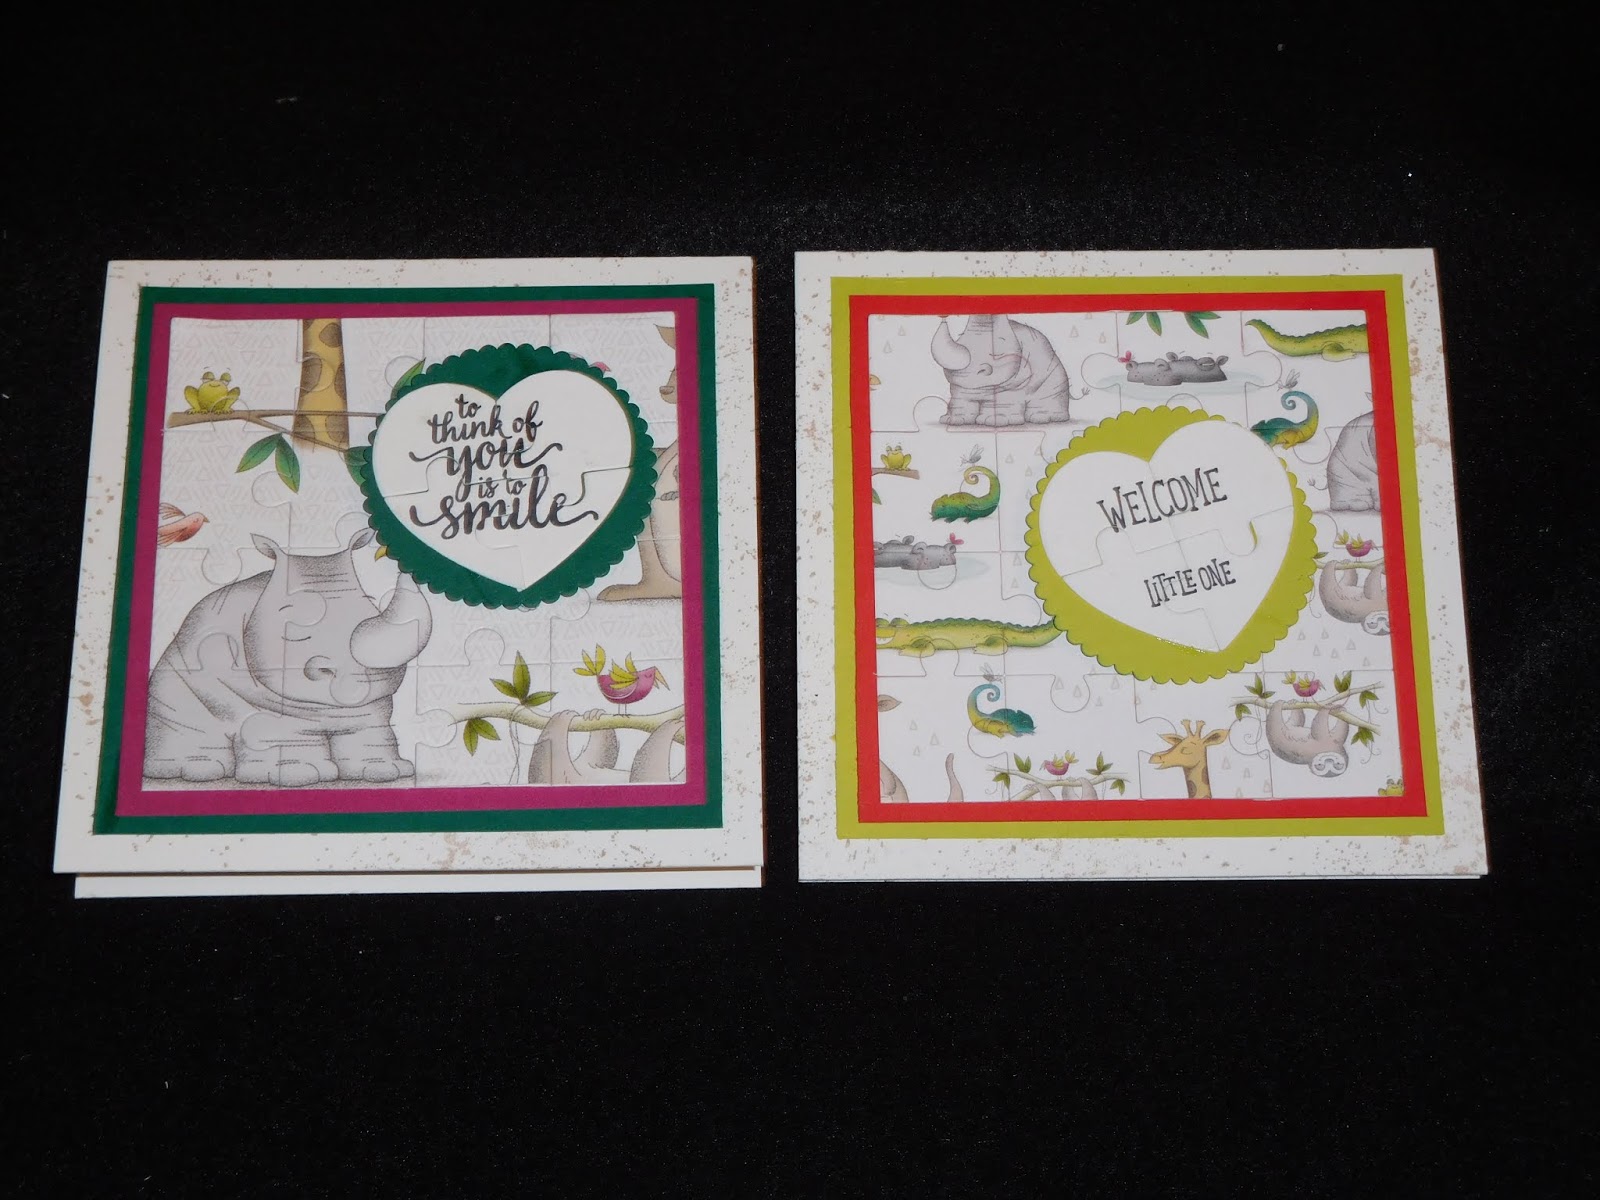
This is a photo of both options for the card;
many people chose to make both.  The
design is the same, using different pieces
of the Animal Expedition DSP and different
color choices.  I love them both.


The card is a 4 1/2 x 4 1/2 using SU 
Whisper White Thick for the card base.
The front background is stamped in SU
Crumb Cake ink on both cards using
SU Touches of Textures Stamp Set.

The front panel is SU Shaded Spruce and Berry Burst.
The scalloped circle is Shaded Spruce with
a Whisper White Puzzle Heart for the sentiment.


The front panel on this card is SU Lemon Lime Twist 
and Poppy Parade.  The scalloped circle is Lemon Lime Twist.

To make the Puzzle piece front panel cut a 
3 1/2 x 3 1/2 piece of SU Whisper White Thick
cardstock and your choice of the 
Animal Expedition DSP.  Adhere the DSP
to the Whisper White Thick piece.  Using 
the Puzzle Pieces Dies cut this going only once through the 
Big Shot; don't come back, only one way!
This way the puzzle stays together.  If you want 
it to fall apart, then you will need to go through 
more than once.  I would only do this for 
someone who loves to put together puzzles.
Make the front layer panel and adhere to 
the front of the card.

For the Puzzle Heart, this will come apart and 
you will then adhere it to the front of 
the scalloped circle piece.  Then using SU
dimensionals adhere to the front panel of the card.

I don't have photos of the inside of the card or the envelope;
I did die cut some of the Animal Expedition DSP and 
adhered 3 cut pieces to the inside of the card
and the front of the envelope in a random 
pattern.  And since the DSP is double sided, I 
flipped some of the pieces to give a different look.


Supplies:

Paper

Whisper White Thick Cardstock – 4 ½ x 9, scored @ 4 ½ for the card base; 3 ½ x 3 ½ to place DSP on and die cut for the puzzle piece layer

Whisper White Cardstock – 2 ½ x 2 for front sentiment heart

Animal Expedition DSP – 3 ½ x 3 ½ for the puzzle piece layer; random puzzle pieces for inside of the card and envelope

Poppy Parade or Berry Burst Cardstock – 3 ¾ x 3 ¾ for the Puzzle Piece layer

Lemon Lime Twist or Shaded Spruce Cardstock – 4 x 4 for Puzzle Piece layer; 2 ½ x 2 ½ to die cut Layering Circles Scalloped sentiment piece

5 x 5 envelope

Ink

Memento Black to stamp front and inside sentiment

Crumb Cake to stamp background on front of the card

Stamps

Touches of Texture to stamp the background on the front of the card

Animal Outing for “Welcome Little One”

Eastern Beauty for “To Think of You is to Smile”

Other

Puzzle Pieces Thinlits Dies to cut the puzzle piece and sentiment piece

Wednesday, August 22, 2018

Come Stamp With Me - Mini Silver Gable Gift Box Project

This is the last post for the July Come Stamp With Me Special Occasion Class.  I am a day late due to many conflicts and problems with saving the original post.  The Mini Gable Box used in this project comes in both Silver and Lustrous White.  The decorated Box can be used for a gift card, a small gift, special notes, or small treats.  It can be decorated however you like; let your creativity imagine what you can do using this as a sample.  This project is decorated to go along with the theme of Special Occasion Cards.  Below are photos of the two options offered in the class and the Supply List.


This photo shows the front of each Mini Gable
Gift Box.  The box on the left is for an engagement,
wedding shower, or wedding gift.  The box on the 
right is more general and can be used for most
special occasions.


This photo shows the back of each box using a 
different decoration.


This photo shows a closer view of the front of 
the gift box.  The flowers are stamped using 
SU Petal Palette and die cut using the Petals &
More Thinlits to die cut them.  The flowers are 
colored using SU Stampin' Blends - Petal Pink,
Light & Dark for the flowers and Old Olive,
Light & Dark for the leaves.
The Whisper White sentiment piece and the 
Grapefruit Grove & Powder Pink hearts 
are die cut using the Stitched Labels Framelits.


This is the back of the same box, again using the
large floral corner and 2 small floral sprigs.  The
silver ornamental piece used on the front and back
of the gift box is made with SU Silver Foil Paper
and die cut using the Petal & More Thinlits.


This is the front of the second option for the box.
The paper used to decorate both boxes is
SU Petal Promenade DSP.  One piece is cut at 
6 3/4 x 2, scored @ 1/4, 4 1/2, & 6 1/2.  The
1/4 tab on each end is meant to overlap the 
edge.  The second piece of DSP is cut at 6 x 2,
scored @ 4.  This piece is adhered starting at
the corner of the 1/4 overlap, then goes around
the side and to the second 1/4 overlap, which
gives the appearance of a seamless piece of paper.


This is the back of the second gift box, decorated 
using the silver ornamental piece and the two
small flower sprigs.  The flowers on this box are 
colored using SU Stampin' Blends Lovely Lipstick,
Light & Dark for the flowers and Old Olive,
Light & Dark for the leaves.

What ideas do you have for decorating the Mini Gable Box?
Think about special occasions and holidays; or just 
because you want someone to know you care.  Have Fun!!


Supply List:

1 SU Silver Mini Gable Box
SU Petal Promenade DSP (1 @ 6 3/4 x 2 and 1 @ 6 x 2)
SU Silver Foil Paper to die cut the 2 ornamental pieces
SU Whisper White Cardstock to stamp and die cut the floral pieces and the sentiment piece
SU Grapefruit Grove and Powder Pink scraps to die cut the hearts
SU Petal Palette Stamp Set - floral pieces
SU Petals & More Thinlits to die cut floral pieces and silver ornamental pieces
SU Stitched Labels Framelits to die cut the sentiment piece and hearts

If you want more information about the Come Stamp With Me Monthly Classes or how to purchase any of the Stampin' Up products, please leave a comment and I will get back to you.


Thursday, August 16, 2018

Floral Sympathy or Wedding Special Occasion Card

This is the third card from the July Come Stamp With Me Special Occasions Card Class.  This card like all the other cards from this class can be used for a variety of special occasions; birthday, retirement, anniversary, wedding, sympathy, thinking of you, thank you, friend, etc.  Let your creative mind think of all the possibilities you can create.  I encourage people to use my card designs for inspiration and then make changes to make it your own design.  I was actually inspired by Mikela, another Demonstrator for this card.  I made only a few changes to her card.  Or you can use my samples and instructions to make the same card.  What is most important is to have fun and be creative.  Enjoy!


When Stampin' Up introduced their new color
revamp in June, I fell in love with Soft Sea Foam,
which is the card base for this card.  It is a very
soft green shade and hard to see in photos. The 
sentiment layer is die cut with the Petals & More Dies
using SU Shimmery White cardstock. 
The sentiment option, Congratulations, can be 
used for many different occasions; graduation,
promotion, new job, engagement, or any of the 
occasions mentioned above.


The right corner of both cards are made using 
SU Shimmery White cardstock and SU Springtime
Die Cuts.  It is adhered to the card using a 
Tombow Mini Dot runner.  The flowers are
die cut from the Springtime floral corner
using SU Flirty Flamingo and SU Powder Pink
cardstock.  The leaves are punched with the
Leaf Punch using SU Soft Sea Foam cardstock (2)
and SU Vellum paper (3).  The card is further
enhanced by using SU Artisan Pearls.


This is the inside of the card with 1 vellum leaf, 1 
flirty flamingo flower, and 1 powder pink flower.
There is no inside sentiment to leave the option open
for you to decide if you want a sentiment or want it
blank to write a special message.


Supplies:
Soft Sea Foam Cardstock - 5 ½ x 8 ½, scored @ 4 ¼ for the card base; scrap piece to punch 2 leaves for the front of the card
Whisper White Cardstock – 5 ¼ x 4 for the inside panel
Shimmery White Cardstock – ¼ of a sheet to die cut Springtime Floral for the front of the card and the sentiment label for the front
Vellum Paper – ¼ of a sheet to punch 4 leaves, 3 for the front of the card and 1 for the inside of the card
Powder Pink and Flirty Flamingo Cardstock – ¼ of a sheet to die cut 2 flowers in each color for the front and inside of the card
Whisper White Envelope
Memento Black Tuxedo, Flirty Flamingo, Powder Pink & Soft Sea Foam Inks to stamp the sentiments and flowers on the envelope
Flourishing Phrases Stamp Set – Congratulations for front sentiment and alternative sentiments will be provided for inside sentiment
Itty Bitty Greetings Stamp Set – With Love & Sympathy for front sentiment and alternative sentiments for the front
Perennial Birthday Stamp Set – Flower and Leaf for the envelope
Artisan Pearls for front of the card
Springtime Impressions and Petals and More Dies  
Leaf Punch
Tombow Glue, Tombow Mono Dots Runner, silicone mat, glue dots, mini and regular dimensionals

I hope you like this card and are inspired to be creative making your own Special Occasion Cards.  If you have any questions about the card, my monthly classes, or how to purchase Stampin' Up products, please leave a comment and I will get back to you.

Creatively yours,

Sher


Tuesday, August 14, 2018

Get Well Hand Delivered Card

This is the second card for the July Come Stamp With Me Class on Special Occasions Cards; a get well card using the Host Hand Delivered Stamp Set.  This is an awesome stamp set and I have created a number of cards using it.  If you want this stamp set, contact me to host a General Stampin' Up (SU) Workshop, a special class where people order the product rather than paying a set fee, or a Paper Pumpkin Workshop.


I offered two different options for this card.  This
is option #1; the So Saffron panel is embossed with 
the SU Polka Dot Embossing Folder.  This layer 
is also used on option #2 below and is the 
border edge.  You can find the information on
the supplies I used for these cards below.


This card option #2; the only difference is the
use of retired SU Night of Navy Designer Series
Paper (DSP) on top of the SU So Saffron
Polka Dot panel.  The stamp set used for
the front panel and the inside panel is the
SU Hand Delivered stamp set.  The woman,
 sign, and sentiment are stamped in Memento 
Black on the SU Whisper White panel.  The 
skirt is paper pieced by stamping on the SU Garden
Impressions DSP and then fuzzy cutting out
the skirt and adhering it to the stamped skirt
with Tombow Glue.  The shoes are colored in
using SU Night of Navy Dark Stampin' Blends.


This is the inside of the card with a panel of 
SU So Saffron and SU Whisper White panel.
The flowers are stamped three times in each 
corner in Memento Black and 
colored in using either SU Stampin' Blends
or SU Markers.  The leaves in SU Blends
Old Olive, the flower petals in SU Marker
So Saffron, and the center of the flower
 in SU Blends Calypso Coral.  
This floral pattern is also used on the front of the envelope,
but colored in using SU watercolor pencils.

Supplies:

Night of Navy Cardstock – 4 ¼ x 11, score @ 5 ½ for card base; 4 ½ x 2 ½, front layer panel
So Saffron Cardstock – Two 5 x 3 ¾, 1 for the front panel embossed in large polka dot and 1 for the inside of the card; 4 ¼ x 2 ¼, front layer panel
Whisper White Cardstock – 4 7/8 x 3 5/8 for the inside panel; 4 x 2 for the front layer panel
Night of Navy DSP – 4 7/8 x 3 5/8 for the large front panel (optional)
Garden Impressions DSP – small piece to stamp & cut out the skirt
Whisper White Envelope
Memento Tuxedo Black to stamp sentiments and inside panel & envelope flowers, alternate option is Night of Navy
SU Blends – Night of Navy Dark for shoes, Old Olive Light for leaves, Calypso Coral Light for center of flower on the inside panel
SU Marker – So Saffron for the flowers on the inside panel
SU Watercolor Pencils – Daffodil Delight for flowers on envelope, Calypso Coral for the center of the flowers on the envelope, and Old Olive for the leaves on the envelope
Hand Delivered Stamp Set for all stamping; you can use alternative stamps for inside panel, this is optional
Polka Dots Basic Embossing Folder
Option – add Glitter Dots or Sequins
Tombow Glue
If you have any questions about this card, my monthly classes, or how to purchase the Stampin' Up products, leave a comment and I will get back to you.  I hope this card inspires you to use your own creativity and  make something to share with others.
Creatively Yours,
Sher

Thursday, August 9, 2018

Three Fold Window Card

For my July "Come Stamp With Me Class", there was a focus on Special Occasions Cards and it included at least one special folded card technique, which will be continued in my monthly classes.  Today's post features a three fold window card that can be used for many different occasions; wedding, sympathy, birthday, bridal shower, thank you, retirement, anniversary, and graduation for a few examples.  I really enjoy learning and sharing new techniques for card making.  Today's card was inspired by Jan Brown, a Stampin' Up Independent Demonstrator.  She has a video on You Tube that will give you the step by step instructions on how to complete this project as a 6 x 6 card.  My card is a 5 1/2 x 3 5/8, adapted to be able to use 8 1/2 x 11 cardstock, see dimensions and brief instructions below.


 This is a card sample of a wedding card with the envelope; showing the card closed.


This shows the wedding card open; going from left to right - front panel, middle panel, and sentiment panel


This is the same card using "With Sympathy" sentiments. I colored the floral panel on the envelope using a sponge dauber; So Saffron for the flowers and Mint Macaron for the leaves.


The butterfly on the front of the card was created by using the Brusho Crystal Colors (mainly  yellow, some blue and just a tad of gamboge orange) on Shimmery White cardstock and spritzing it with water, adding color I got what I liked.  Then I die cut one butterfly from the Brusho Color cardstock and one from So Saffron.  I attached the Brusho butterfly on top of the So Saffron butterfly the middle only with a glue dot.  This way when you open the card you see the butterfly and not the back of the Brusho cardstock. The butterfly is attached to the front window using a glue dot, and placed so the top part is showing in the window opening.

Card Supplies:
 
SU So Saffron Cardstock – 5 ½ x 10 7/8, score @ 3 5/8 & 7 ¼ for card base; small piece to die cut butterfly

SU Very Vanilla Cardstock – ½ of a sheet to die cut the window frames and sentiment oval

SU Shimmery White Cardstock – ¼ of a sheet to die cut 2 floral corners and 3 flower sprigs; ¼ of a sheet to watercolor with Brusho Colors (yellow, blue, gamboge) to die cut butterfly

SU Very Vanilla Envelope

Memento Tuxedo Black ink to stamp the sentiments on inside of card and envelope

SU So Saffron and SU Mint Macaron ink to color the floral corner on the envelope; optional to do the same to any of the flowers on the card, there will be less contrast if you do this

SU Rose Wonder Stamp Set (retired) for the sentiments on the card; you can choose alternative stamp sentiment options

SU Layering Oval Dies, SU Stitched Shape Framelits, SU Petals & More Thinlits, & Catherine Pooler Beautiful World Dies (butterfly)

Sponge Daubers

I plan to post at least twice a week; Tuesdays and Thursdays.  I may post more often and will let you know if that is happening.  If you have any questions about these cards, my monthly Come Stamp With Me classes, or how to purchase Stampin' Up (SU) products, please leave a comment and I will get back to you.