Monday, April 25, 2016

March Birthdays #3

Okay, this is the last of the March Birthday cards.  It is for my great niece who turned 12 this year.  She is growing up too fast, don't they all do that?  This is another Crooky Cake card.  I do love that stamp set.


The card base is SU Whisper White Thick, the center
piece is SU Whisper White.  The frame on the front
and inside of the card is SU Coastal Cabana (retired).
This same paper was used for the top of the 
Birthday die cut.  The bottom is on black cardstock. 


The inks used on this card are SU Melon Mambo, 
Tempting Turquoise, Perfect Plum, Pear Pizazz,
and Daffodil Delight.  Of course, the sentiments 
were stamped in black. 

On this card I added the icing dies to the cake.
It finishes off the cake.  


The inside of the card using the inside of the 
frame die.


Here is the front of the envelope and card.  The 
sentiment on the envelope is Bring on the Cake.
I wonder how else I can use this stamp set.  Can 
you come up with other creative color combinations?
How would you use this stamp set?


March Birthdays #2

This is my sister's card.  It is a card from Brandy Cox.  She is a SU Demonstrator and often does 10 cards in 20 minutes.  This is from one of her YouTube videos.  I did make some minor changes and not many.  It is important to me to give credit to the original designer.  It is unethical to take credit for someone else's work.


This card is made with all SU products using 
two stamp sets; Butterfly Basics and Gorgeous Grunge.
The inks used are SU Hello Honey, Old Olive, Wisteria 
Wonder, and Early Espresso.  


Using the Butterfly Basics stamp set stamp the following.
First stamp the fern in Old Olive stamping off twice 
to get the three ferns.  Then stamp the honeycomb
three times using Hello Honey.  Stamp the sentiment 
in Wisteria Wonder at the bottom left.  
Then using Gorgeous Grunge dots stamp in a 
random pattern using Early Espresso ink.  Repeat 
this pattern inside the card and on the envelope.

Stamp the butterfly from Butterfly Basics on a 
scrap piece of Whisper White paper using 
Wisteria Wonder ink.  Then cut it out using 
SU Bold Butterfly Framelits on the Big Shot.  
Use dimensionals to place the butterfly 
on the front of the card.  You can
 lightly fold the butterfly in the middle to
make it appear to be flying.


After you have repeated the pattern from the 
front of the card. Stamp the butterfly.  I would move
 the fern up higher so you can see the butterfly better.
Then add the sentiment from the Butterfly Basics 
stamp set.


This is the front of the envelope.  Again, move 
the fern up higher to all the butterfly to shine..


This is the back flap of the envelope.  I like carrying 
the theme of the card on the back sometimes.


This is the envelope liner from purple butterfly 
paper I had in my very large stash. 


March Birthday's #1

I am closer now to being all caught up.  There are three birthdays in our family in March and they are within the first week.  The birthdays are my sister's , her son, and his daughter.  I will post the cards I made in separate posts.  This one is for my nephew.


I really like this card.  I used Stampscapes
stamps for this card except for the sentiments.
I cut the ovals using SU Whisper White for the
scene and SU Early Espresso for the frame.  The card
base is also SU Whisper White Thick.

The inks used are SU Soft Sky and Early Espresso.
For the central scene, I stamped the trees on a 
hill first leaving about a quarter of the space for the
clouds at the top.

I then put the scene on the frame and set is on 
the card to see where I wanted to stamp the rest of
the card.  I stamped the clouds first stamping 
off until there just barely any color.  Then I added the 
trees to the bottom left corner.    I repeated this pattern 
on the front of the envelope.  The sentiment on the
front of the card is from SU Express Yourself (retired).


The inside of the card.  I repeated the sky and tree
pattern from the front of the card.  The sentiment is
one I've had for a very long time.  It is from Imaginations.
I don't know if the company still exists.


Happy 90th Birthday Celebration

This is the last February birthday card and it is a special celebration.  My Aunt Mary turned 90 this year and her family had a surprise party for her.  They asked us all to send cards.  They wanted to have at least 90 cards for her.  So, I made two; one for me to sign and one for my husband to sign. They received way more than 90 cards.  The party was a great success.  Many of us traveled from out of state to celebrate.  So, it was a big family reunion.


Aunt Mary is in the pink top.  Her husband is behind her.
Her oldest daughter, Chris is next to her.  Chris put this
all together.


Does this woman look 90; I think not.  She is an
amazing woman full of heart, fun, and lots of spunk.


Here are the two cards I made.


This is the Crooky Cake card made with SOA,
Young at Heart stamp sets and dies.  I love this 
SOA set, it is so fun.  Check out the Catherine Pooler
Stamp Nation blog, link on this site, for all the 
information about where and how to get 
these stamps and dies.

This card uses the Crooky Cake stamp set and cake and frame dies
by Cas-ual Fridays, Ring in the Celebration by Winnie 
and Walter; and sentiments from Young at Heart Sentiments by 
Sugar Pea Designs. 


The inside of the card.  I love this sentiment.  The SU
Coastal Cabana is the inside of the frame die.  


The envelope and front of the card.  The  ink colors 
used in this card are SU's Melon Mambo, Tempting
Turquoise, and Elegant Eggplant.  


This is the second card I made.  This came from
SU Tin of Cards kit.  The front of the card is
all SU.  The inside is from SOA Young at Heart.


The inside of the card is mostly from SOA Young
at Heart sets by Sugar Pea Designs.  The 'with love'
is from SU August 2015 Paper Pumpkin kit.  If you 
haven't tried Paper Pumpkin, check it out on my 
my blog and SU website.


Below is the envelope using the same
stamp sets as the inside of the card.


Below is the card and envelope together.
The sentiment on the envelope is from 
SU Serene Silhouettes set (retired). 


Happy Birthday Aunt Mary, may you have many
more for us to celebrate.


February Birthday cards

I continue to catch up to myself as I also make current posts.  This is another catch up post.  Here is the second February birthday card I made.  This is for my nephew.


The base card is Stampin' Up Very Vanilla and 
embossed with SU World Map embossing folder.
Two small strips of SU Going Places 
Designer Paper was added.  SU Coastal Cabana
is the frame for the Sentiment.  Happy Birthday Wishes
is die cut from Stamp of Approval (SOA) Young 
at Heart collection in the same SU Going Places
Designer Paper.  The collage background for the
sentiment is SU Crumb Cake paper.  It is stamped
with SU Crumb Cake ink using SU Clockworks
and Gorgeous Grunge stamp sets.


This is the inside of the card.  The same cardstock
from the front of the card is used here.  I added some
star stamps and wink of stella to give it some shine.
The sentiment is from SOA, Young at Heart stamp set.
I really love this look for a masculine card


This is the envelope using the same stamp set
used on the card.


Here is the card and envelope together.


Wednesday, April 20, 2016

Sharing a beautiful quote about those of us who are artisans

I was moving through the  Stamp Nation's Stamp of Approval Blog Hop yesterday and saw this quote on Melanie Muenchinger's blog,   Hands, Head, and Heart.  I was so touched by this quote as it described exactly how I feel about being a creative artist.  I hope this touches you.

"A woman who works with her hands is a Laborer; a woman who works with her hands and her head is a Craftsman; but a woman who works with her hands, her head, and her heart is an ARTIST."

                                                                                  Louis Niger

April Paper Pumpkin Wreath Kit

I just had to post this even though I am still not totally caught up with all I've made this year.  I will still continue to catch-up and this couldn't wait.

What is Paper Pumpkin?  It is a monthly kit that comes to your home full of great supplies and creative ideas.  You can do the project exactly as it comes or be creative and make other projects as well.  There are many resources out there on alternative creative ideas for Paper Pumpkin.  You can find them on You Tube and Pinterest.

How do I get Paper Pumpkin?  You can order it through my Stampin' Up Demonstrator site.  I am listed under Sherry Huss in Taylorsville, Utah.  See the Stampin' Up Link on this site.

Here's some photos of this month's project.

Step One:  I've taken it out of the orange Paper Pumpkin box and started to wrap the leaf sheets on to the foam wreath form.  You can see a picture of the completed project in the background.


Step Two:  The completely wrapped wreath


You can see the Paper Pumpkin box behind the wreath.


It took maybe 30 minutes to do this due to many 
interruptions.


Step Three:   Folding the flowers and adding them to the branch.


Step Four:  Stamping the sentiment and adding it to the hanging board.


Step Five:  Adding the flowered branch, hanging board and ribbon to the wreath.  Voile, it is complete in less than an hour.  Oh what fun!


This will be hanging in my art studio,  It is so pretty.
Don't you want to make one?  You can subscribe to
Paper Pumpkin and start receiving the monthly kits by 
going to 
https://mypaperpumpkin.com?demoid=2165672


Wednesday, April 13, 2016

More from early 2016 - almost caught up

February 2016


Dragonfly Triple Layer Card


This is my second triple layer card.  You can find the
dimensions and instructions for completing a 
triple layer card.  It is an old technique and one 
that is classic.  There are some techniques that
I want to use over time and return to over and over.
I made this card for my niece's 40th birthday.  She
loves dragonfly's.


I used SU Tempting Turquoise cardstock for the card 
base and contrasting layers.  I used SU Tempting 
Turquoise ink for the sentiments and to add some 
highlights to the card front and inside of the card.
The sentiment on the front is from SU Express Yourself
stamp set and is punched out using SU Modern Label punch.


This is the inside of the card.  The theme from the 
front is carried forward to the inside of the card and 
below on the envelope.  I used SU Tempting Turquoise,
Perfect Plum, Wisteria Wonder, and Old Olive inks on
                                        this card.  I did stamp off on some of the ferns and                                        dragonflies.  The stamps I used were from 
 SU Awesomely Artistic.   The sentiment is
the exception.  This is from the Stamp of Approval (SOA)
Young at Heart Collection, Casual Fridays Crooky Cake stamp set.       


This is another view of the front of the card and the 
envelope.  This card does reflect some of my 
favorites techniques and style of stamping.  I hope you 
enjoy it too and are inspired to create beautiful cards.  Please share 
your cards with me.  I love connecting with other artisans.


Monday, April 11, 2016

Still Catching Up - Early 2016


January 2016

Triple Layer Floral Card

My sister-in-law loves purple so I wanted to give her a birthday card with a lot of purple.  This is an older technique that I used on this card.  It is the Triple layer card that is so easy when you have the instructions.  You will find them below.


The first photo is the front of the card and envelope.  
I used SU Whisper White cardstock for the stamped layers 
and SU Elegant Eggplant for the card base and contrasting color layers.  
I used a combination of  SU Butterfly Basics stamp set
 and the Stamp of Approval (SOA) Friendship/Eva's Favorite Flowers for this card.  
I embossed the right corner of the Whisper White
with the Darice Fluttering Butterfly corner embossing folder.
I stamped the Butterfly using SU Butterfly Basics stamp set
and punched it out using SU Elegant Butterfly punch.
 I used SU Elegant Eggplant, Perfect Plum, Wisteria Wonder, and Pear Pzazz inks.


The above photo is the inside of the card.


This is the back of the envelope.  I am stamping 
the back flap more often now.  I like it.


This is the envelope liner.  I think it really finishes 
off the envelope.


Triple Layer Card Instructions:

This technique has been around for a long time.  I have found many different cards and instructions
on Pinterest.  I have used the most common A-2 card size (5 1/2" X 4 1/4") with a side fold.

Cut the Elegant Eggplant (card base & contrasting layers) and Whisper White for the stamping layers.

For the card base and darker contrasting Elegant Eggplant layers:

  • 51/2" X 8 1/2", fold in half at 4 1/4 on the 8 1/2 side for the card base of 5 1/2"X 4 1/4"; 
  • 2 1/4" X 3 1/2" and,
  • 3 1/4" X 4 1/2" for the contrast layers
Set these aside for now

For the stamping layers on Whisper White:

  • 2" X 3 1/4"
  • 3" X 4 1/4"
  • 4" X 5 1/4"

Using temporary tape, layer the Whisper White layers on top of each other.  At this point
I embossed the right corner with the Darice Fluttering Butterfly corner embossing folder.  If you
don't want to do this, think about where you want your sentiment if using one.  The sentiment should
be stamped first or you know where you will  place the sentiment.

Now, let your creativity flow.  Stamp on the layers with whatever stamps you choose.  I started with
the larger flowers and the fern leaves first.  Then I filled in with the medium and smaller flowers.  Be sure to stamp off the edges of each layer.  Mix the different colors around the page.  Stamp until you like what you see.  There is no right or wrong way to do this.

Note:  You can use flowers, leaves, snowflakes, hearts, butterflies, trees, graphics, words, or any stamp you want with this technique.  It can be a masculine or feminine card depending on what you use.

Take the white layers apart and don't worry.  Just wait for the magic now.


  • Take the large (4" X 5 1/4")  stamped layer and adhere it to the front of the Elegant Eggplant card base.  
  • Now adhere the 3" X 4 1/4" stamped layer to the 3 1/4" X 4 1/2" Elegant Eggplant layer; then adhere it on top of the first layer on the card base.
  • Adhere the 2" X 3 1/4"stamped layer to the 2 1/4" X 3 1/2 " Elegant Eggplant layer; then adhere on top of the middle layer.
Do you see the magic yet?   I decided to add the butterfly on the card and adhered it with SU Dimensionals.


7th Birthday Present Card and Bag

This card and gift bag was made for my great-nephew.
His birthday is actually December 26th and we
always celebrate his birthday in January.  It was 
his 7th birthday and I want to make something 
bright and fun.


I mainly used designer paper for this card to 
create the background.  The presents were stamped
using DeNami birthday present stamp and SU 
Tempting Turquiose, Calypso Coral, and Daffodil
Delight inks.  For the envelope I used Brenda 
Walton stickers.


This shows the card, envelope, and gift bag.


Close-up of the front of the card.


The inside of the card.  Instead of stamping on the
inside of the card, I use a strip of the designer
paper to tie it to the front of the card.


A close up of the gift bag.  It has a gift card for
a birthday date with me.  I take my great-niece and nephews
on a birthday date each year so we have time together.  We
go to a movie, out to lunch, and shopping.  I love these 
birthday dates.


Birthday Rings Card

I made this card for my nephew in-law for his 
birthday in January.  I tried a new technique for me
using a stencil, inks and a Ranger Ink blending
tool.  The stencil is Pattern of the Rings
 from Winnie & Walter that came in the 
Stamp of Approval (SOA) Friendship set in August.
You can learn all about SOA on Catherine Pooler's 
Stamp Nation site; see the Link on this site.  
It is an awesome place where
card makers and other paper crafters come together.
I used greens, yellows, and light browns to
create an ombre look.  I loved how it turned out.
The photo doesn't do it justice.  This was done
on SU Very Vanilla cardstock.


The card base is SU Soft Suede.  The large frame layer is 
SU Early Espresso.  The sentiment is from the
 SU  Perfect Punches stamps set (retired)
and stamped in SU Early Espresso.
 It is punched out with SU Large Oval Punch.
It sits on top of  SU Very Vanilla cardstock
stamped in SU Brown Sugar ink (retired)
using SU Gorgeous Grunge and Clockworks stamp sets.
The frame layer for this is SU Soft Suede cardstock.
Brown and white twine is behind the sentiment.
The sentiment is raised by SU dimensionals.


This is the inside of the card.  I carried the Gorgeous
Grunge  and Clockworks theme from the front.
The sentiments are 
stamped in Early Espresso and Brown Sugar.
Good wishes... stamp is from SU Lovely Amazing You
The other sentiment is from Savvy Stamps. 


The front of the card and envelope.  The same theme
of Gorgeous Grunge and Clockworks continues on the envelope.  The sentiment 
from the front of the card is also used on the envelope.

Christmas 2015 - still catching up

July - December 2015

Christmas is my favorite theme for card making. 
I start sometime between July and August 
and work on my cards until early December.  I generally design
at least 5 different cards.  I get bored after I make 25 cards of one
design. I make about a 100 cards each year.  I
know, try obsession.  Once I started sending out handmade 
Christmas cards, I couldn't stop.  It gives me such joy to make
these cards.  I hope you enjoy them and get some ideas for
next year.  Keep coming back and I will be posting as I design and 
make the cards this year.  Here goes.....

Ornament Card

This was the first card I designed in 2015.  I saw a 
similar card on Pinterest and had to CASE this card.
I did make some changes to the card and not many.
I used SU Real Red cardstock for the card base and embossed 
the front about 3/4 down  with SU Lacy Brocade embossing folder.  
SU Whisper White was used for the front layer 
and the inside of the card.  Both were edged 
with SU Early Espresso ink using a sponge. 
SU Early Espresso cardstock was used on the 
front to frame the white square.  The sentiment
on the front of the card was stamped with 
SU Real Red using SU Greetings of the Season stamp set.
The ornament was die cut with the Big Shot using
SU Holiday Ornaments Framelits set
and SU Candlelight Designer Paper.
Cut 3 ornaments and fold in half.  Then put together to 
create a 3-D ornament.  Use a silver wire for the hangar
on the ornament.  Use SU piercing set for the
SU Ornament Keepsakes stamp set
and pierce holes around the ornament.


Front of the card and envelope


Inside of the card.  Used a small ornament from 
the SU Ornament Keepsakes stamp set and 
stamped with SU Real Red ink.  The sentiment
from the SU Joyful Christmas stamp set (retired)
was stamped using  SU Early Espresso ink.


The front of the envelope using a die cut 
ornament and the same sentiment
from the front of the card.


Snowy Trees

I made this card at an Archiver's class before
they closed their Orem store.  I decided to give 
away cards I had made and kept as samples.  There
is no need to hang onto cards, so I sent them out
to special people.


I  added the SU Festival of Trees stamp, fir tree
and SU Snow Swirled stamp, Season's Greetings
to the front of the envelope.


This is the inside of the card.  I added the SU Whisper White
cardstock, the silver tree, and the sentiment from the
SU Ornamental Pine stamp set and embossed in silver.
I think this card is simply beautiful.


Hanging Ornaments Card

This is another card I made at an Archiver's class.  
This card used different techniques.  First, if you look 
close you will see the front layers and the card base
corners are all punched out with a corner punch.
The ornaments are colored in using Copic Markers and
three of them have clear crystal to give them a glazed look.
This is a fun card.


The front of the card and envelope.  I added the 
blue ornaments using SU Ornament Keepsakes stamp set and 
SU Soft Sky ink.  The sentiment is from DeNami.


Again I finished the inside of the card with a blue
ornament from SU Ornament Keepsakes stamp set.  The sentiment is
stamped in SU Real Red ink using  the SU Snow Swirled stamp set (retired).


Merry Christmas Trees Card

This is another card I made at an Archiver's class.
I loved this card so much, I bought the
Hero Arts Merry Christmas Trees stamp set
and have used the embossing technique over and 
over again on a number of different cards and using 
different stamps.


There was a lot of embossing on this card. The sentiment
was embossed and both trees were embossed.  The
smaller tree used a lettuce green embossing powder
with gold embossing powder.  They were put on separately
and then embossed.  Colored rhinestones were added
to the green tree.  The background layer was cut
out using a die and the Big Shot.  The trees were 
fussy cut.  I embossed the envelope using the same
technique on the tree and stamping the sentiment
with gold metallic ink.


This is the inside of the card.  I added the white cardstock
and again embossed the small tree on the inside.  I stamped
the SU Snow Swirled sentiment in versamark and embossed it with gold 
embossing powder.  This a simple and beautiful card.


Do You Believe Card

Yes, another card from an Archiver's class.  This card 
was made using Tim Holtz Stamps and paper.  The stamps 
were huge and fun to use.  The Santa was stamped in
black and then colored in using Copic Markers.  Notice the 
angled cuts on all the papers, it gives interest and texture
to the card.  I really liked adding the black twine in the front.


The BELIEVE and 25 were also stamped and 
added to the collage of the front.  It was hard to
part with this card.


The inside papers were already there from the class.
I added the red flowers from SU Wondrous Wreath stamp set.
The sentiment is Printworks Spirit of Christmas  stamp.
I BELIEVE, do you?


Snowman Card

Another Tim Holtz card.  He is so creative, I 
can never get enough.


This card is made from Kraft cardstock both as the base
and front layer which is backed with a red layer.  The
snowman is stamped with craft white ink.  Isn't he cute?
There is a small square patterned paper on the right.
One corner is folded up and stapled with mini staples.
Then the December calendar was added.  On top
of it all is the metal ornate piece.  I did the inside
of the card and somehow didn't take a photo.


The front of the kraft envelope.  I stamped the DeNami snowflakes 
and  De Nami snowman family in white craft ink.  The simple
sentiment is stamped in black.


The back flap of the kraft envelope.   Again, the
DeNami snowman family and snowflakes.  This card went 
to my niece and her family.  She loves snowmen.


Reindeer Noel Card

Yes, it was a Tim Holtz card class at Archivers.  This
is the third of four card we made in this class.


This is the front of  the card and envelope.  There
were two layers of designer paper added to the Kraft 
cardstock.  The green paper was the full front, with the
white, green and gold paper as a square covering about
3/4 of the green paper. On top of that, a thin kraft paper
was added with a red reindeer stamped on it.  The edges were
slightly torn and one corner folded up and glued in place.
The SU Noel sentiment from the
Greetings of the Season stamp set was stamped in
craft white on the green paper.
 A red flower was added on the left side
between the reindeer and sentiment.
The front of the 
envelope was stamped with
a holly stamp and the Noel sentiment.  


This is the inside of the card.  I used the holly stamp in top
right and bottom left corners.
The DeNami Joys of the Season sentiment is stamped in black.


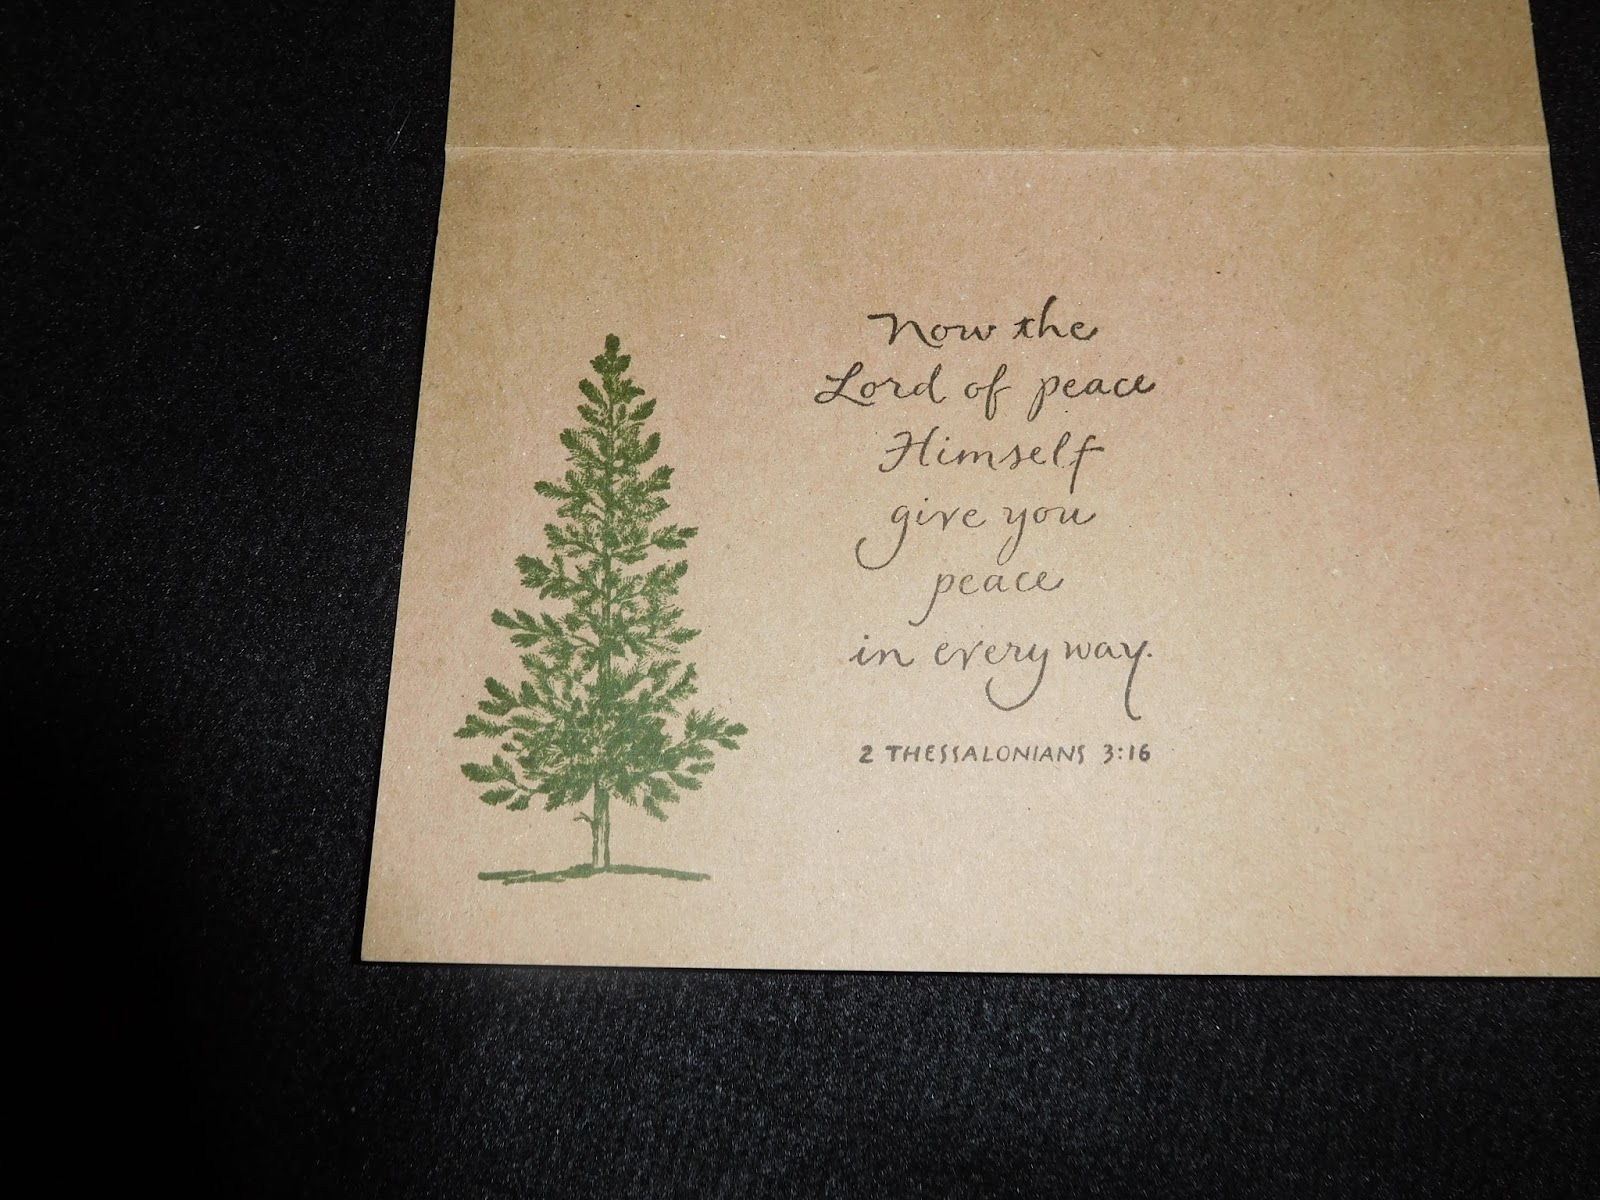
Peace, Love, & Joy Card

Okay, this card still hasn't been sent out and it was the
fourth card in the Tim Holtz card class.  So, I had to share it with you.  
This is such a beautiful card.  
The photo doesn't do justice to the card.


This is the front of the card and envelope.  Again,
we used designer paper as the front layer.  It was 
backed with a dark brown layer on top of kraft
cardstock as the card base.  The sentiment was
stamped in a brown distress ink, I think Walnut Stain.
The circle on the left was a white layer on which we stamped the 
moon and tree scene using stamped off technique
to give the muted look.  It is layered with copper cardstock.
It is a circular metal branch that highlights the circle.
A green ribbon was added on the bottom of the card.
On the envelope, I stamped the fir tree from the
SU Lovely as a Tree stamp set.


I kept the tree theme on the inside of the card using
the fir tree from SU Lovely as a Tree stamp set.
 The sentiment is stamped in brown using
Wordsworth "Now the Lord" stamp.       
  This card is so serene and beautiful.
I love Tim Holtz.  Did I say that already?


These next two cards were actually made in 2014.  I didn't 
take photos of my Christmas cards in 2014 because I was late in 
getting them sent out.  I learned my lesson, take the photos as 
I make the cards.  I had extras of these two cards and did
send them out to new people on my card list.

Comfort & Joy Card

   
This square card was made using SEI designer paper.  The 
holly leaves on the paper are felt.  It is so fun to rub this
paper. It is stamped with SU Ornaments Keepsake stamp
set and cut out with the SU Holiday Ornaments Framelits.  
The sentiment is SU Comfort & Joy stamp set and stamped in 
SU Real Red.


December 25th Collage Card

This card was mostly made by cutting paper or using 
my Cricut to cut out the Dec 25 and red frame.  The 
holly was cut out with Quickuts.  I really like doing
collage and it was fun creating this card.  Don't 
you love Christmas and all the fun ideas for cards?
I do.


Joyous Wondrous Wreath Card

Okay, back to the cards I actually designed in 2015.
This is the second card I designed.   I fell in love with
SU Wondrous Wreath stamp set and Wonderful Wreath Framelits.
I will probably use them over and over again.  There
are so many ideas and ways to design and create 
beautiful cards with these tools.


I decided to use traditional colors of red and green for 
this card.  The card base is Real Red.  I used a dark 
green cardstock from my stash as the back layer on
the front.  SU Whisper White is the main front
layer whic is embossed with polka dots.  
I used SU Old Olive and Garden Green ink
to stamp the wreath.  I used SU Real Red for the berries.
Then I die cut the wreath.  I stamped the bow for the
wreath in SU Real Red and die cut it out.  
I stamped the Amuse Stamps "joy" in SU Real Red in the middle of
the white front.  I added SU dimensionals to the
back of the wreath and placed it around the word joy.
Then the bow was added to the wreath using a SU dimensional.


This is the inside of the card.  I put the Su Whisper White
cardstock to pop out the sentiment and small  flowers
from the SU Wondrous Wreath stamp set and stamped
in SU Real Red.


This is the front of the envelope using the sentiment
and small  flowers from SU Wondrous Wreath
stamp set with SU Real Red ink.


Poinsettia Tag Card

This card was inspired by my SU Demonstrator,
Rebecca Fellows.  She had made a Poinsettia Tag
the previous year that I really liked.  The tag on this
card is slightly altered from Rebecca's.  The photo doesn't 
give justice to this card.  This is my third design.


This is the front of the card and envelope.  The card base is 
Bazzil Evergreen cardstock and is a 5 by 7 card.  The red layer is
SU Cherry Cobbler and edged in SU Early Espresso.
The green banner tag is made from SU Candlelight 
Designer Paper (retired).  The next tag is made from
SU Crumb Cake cardstock, edged in SU Early Espresso.
The SU Joyful Christmas sentiment is  stamped in
SU Early Espresso.  

The Poinsettia is stamped twice with 
Versamark ink and embossed with clear  
embossing powder on 
SU Cherry Cobbler cardstock.  One full Poinsettia 
is used on the bottom.  The top Poinsettia is only
the center fussy cut out.  Actually, all the Poinsettias are 
fussy cut.  Where is the die?  I've gotten so spoiled.

Then using a sponge, I lightly added SU
Early Espresso ink to the center and some edges
of the Poinsettias.  Using SU dimensionals, add the smaller
Poinsettia to the larger one.  Add gold dots in the middle of the 
small Poinsettia.  Set aside to dry.  

Stamp three Poinsettia leaves with Versamark ink 
on green cardstock(from my stash) 
and emboss with clear embossing powder.  
Fussy cut out and glue to the 
Poinsetta however you like.  Place on the top
of the Crumb Cake tag.  Add red and white twine
to the double tag.  Glue or tape the tag on the SU
Cherry Cobbler Cardstock angling the Crumb
Cake tag to the left.


Sorry for the side perspective on the card.  It
does give you a different viewpoint.


Side views are so weird and it does get the 
creative juices going when something unusual happens.  
The Poinsettia leaves and the DeNami 
Joys of the Season sentiment
 are stamped in SU Old Olive.  The SU Wondrous
Wreath flower is stamped in SU Cherry Cobbler.


The sentiment from SU Joyful Christmas
 on the envelope is stamped
with SU Old Olive ink and the SU Wondrous Wreath 
 flowers are stamped in SU Cherry Cobbler.


Peaceful Tree Card

This card was CASE'd from Connie Stewart.  She
is famous for her flash card designs.  This card was on 
Pinterest and I basically copied it with minor 
changes.  It was such a pretty card in beautiful blues. 
There were also fun techniques used in making
the card.  This is my fourth design.


This is the front of the card and envelope.  This 
card uses SU Whisper White and Soft Sky cardstock.
It uses SU Soft Sky and Smoky Slate inks.


The card base is SU Whisper White.  Then there
is a 2 1/2 X 3 1/2 SU Whisper White and Soft Sky 
cardstock.  On upper right of the Whisper White cardstock
using the Soft Sky ink, stamp the SU Festival of Trees 
Polka Dot Tree.
Using the Smokey Slate ink and the Polka Dot stamp
from  Festival of Trees fill in the polka dots on the tree.
Just below the tree start to tear the
Whisper White cardstock to create 
a snowy hill for the card.  Set both of these pieces to 
the side for now.

On the Soft Sky cardstock, using the Smokey Slate ink, stamp the 
floral tree from the Festival of Trees stamp set in the lower right corner.  
Do this about 1/2 from the bottom and leave a 1/4 inch on the
right side.  Punch this tree out using the SU Tree Punch.
Set the tree and Soft Sky cardstock aside for now.

On the Whisper White card base stamp a variety of snowflakes on the
right side of the front in SU Soft Sky ink.

On the Soft Sky cardstock using the Polka Dot stamp
from Festival of Trees and Soft Sky ink stamp the whole
cardstock to create the image of falling snow.  Then using
Smokey Slate ink, stamp Peace on the top left corner.

Now take the Whisper White cardstock with the tree stamped on it.  Place the
Soft Sky cardstock on top with the tree showing through the
punched out tree shape.  Make sure none of the white shows
on the bottom or side.  Glue or tape together.

Take the white cardstock you tore to create the snowy hill.  Place it how you
would like to best create the hill effect.  I did it going down from
the left.  I am left-handed and that may be why.  Try it both ways to make your own
design.  Glue or tape the snowy hill to the Soft Sky cardstock.

Put SU dimensionals on the back of the Soft Sky tree and add it to
the left side of  the card on the snowy hill.

Stamp snowflakes on the inside of the card and stamp your sentiment.
I plan to use this technique using different tree stamps and
colors for the different seasons of the year.


Winter Woodland Card

This is my fifth and last design.  I loved
making this card.


This is the front of the card and envelope.  The
card base is SU Soft Sky cardstock.  The frame
layer is SU Early Espresso.  The top layer is
SU Whisper White.  It is embossed using the
SU Woodland embossing folder.  I inked the
embossing folder with Soft Sky to create the
sky in the background.  Then I stamped
the trees with SU Garden Green and the
fir from SU Lovely as a Tree stamp set.  Using
SU Real Red and the bird stamp from
SU Festival of Trees stamp set, I stamped
the bird on a branch on the embossing folder.
Then I put the paper in the embossing folder
and ran it through the Big Shot.

And a beautiful scene is created.  I then highlighted
the birch trees with SU Crumb Cake ink and a q-tip.

The Casual Fridays Snowy Sayings sentiment
from the SOA Holiday Box
is stamped in SU Early Espresso on
Whisper White cardstock and framed in Soft Sky.

The envelope carries the theme with the sentiment,
the fir tree, and the red bird.


This is the inside of the card.  Whisper White
cardstock is used.  The fir tree is on the right side
stamped in Garden Green.  The sentiment from
SU Ornamental Pine stamp set (retired)  is also stamped in Garden Green.

This card can be used as a Father's Day card, a birthday card, a thank you card,
a sympathy card, and the list goes on.  You just change up the theme and sentiments.